Amsterdam houseboats index
Pressurized Kerosene kiln burners;
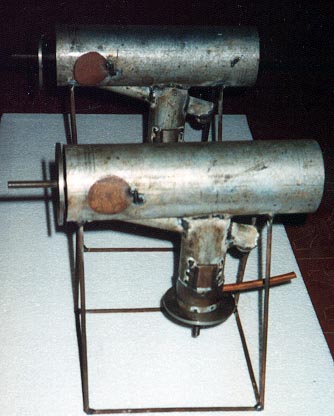
I built two of these burners for my wife’s kiln in India.
The electricity supply there is too unreliable for firing heavy sculpture [in a given 24 hour period, you can be assured of an outage or two], so electric firing was not an option, and neither were powered burners.
The drawing at the bottom of the page represents the third pair of burners I made, and I was very happy with them.
Theory of operation;
The fuel is boiled in the preheat tube, and vapor is emitted from the main jet.
The preheat tube is heated by a “primus” type stove head, fitted inside a 1 ½” pipe. A smaller 1/2” pipe [the preheat tube] passes through the “small” flame at an upward angle. The angle provides a larger surface area inside the preheat pipe where the main burner’s fuel can vaporize. That and the volume helps prevent surging.
The smaller flame exhausts into the main burner tube, providing a constant ignition source for the main burner, preventing blow outs.
Another advantage of this design is that the main burner can be shut off completely by hand or with a solenoid connected to a controller, and then on again without manual preheating and relighting. Although using a controller and solenoid means electricity is required, the demand is only a few watts. I use in inverter and a car [type] battery.
The disadvantages are the difficulty in adding fuel to the system if the tank isn’t large enough for the entire firing [since the tank is pressurized], and safety issues with so much fuel under pressure.
I have had raw fuel [from my earlier burners] shoot straight into the kiln when the temperature was about 900C, and nothing much happened; there wasn’t enough oxygen available in there to burn much of it [major reduction time].
I have used an air compressor tank for the fuel, and fed in fuel through the air compressor, turning it by hand. That will allow any size of fire.
But there was always some air leaking out through the valves, and I had a big LPG tank that was plenty big and strong, so I switched to that. air compressor tanks are stronger, and that’s what I recommend.
The air dampers are disks of mild steel with a treaded hole in the middle, on threaded rods that protrude from the center of the burner tubes. Very simple and works well.
There are little windows cut through the pipe walls to access the jets during operation; they can be cleaned if necessary with a thin wire held in a tool reached through the access hole.
It’s important to have a fuel filter [from a diesel car or light truck works well] before the burners, as any dirt or rust will block the needle valves and jets.
In practice, the burners have light steel stands, and fit snugly into the burner ports in the oven. I have a downdraft kiln, so I preheat the chimney with one burner first, through a port at its base.
We run slow burns, heating by 100 degrees C [180F] per hour. One burner attached to the controller heats our kiln to about 500C [as I recall] before I light the second. As the temperature rises, I pull the burners from the ports, to allow secondary air to be sucked in [also close the chimney dampers a bit]. It’s necessary to partially close the burner dampers to stop the flame from being blown out by the draw. It’s better if as much of the combustion takes place inside the oven as possible, anyway.
At low output, the flame front will be about halfway down the burner tube. At high output, the bulk of combustion will take place inside the kiln. At this point, the burner is really more of a kerosene vaporizer, as the pilot flame boils kerosene that is sucked into the kiln as vapor. It isn’t good for the burner tubes to get too hot, anyway; the steel oxidizes away after a while.
Two of these burners with 1mm main jets had no trouble reaching 1000C [1800F] in a double downdraft kiln of about 200 liters [7 cubic feet] working volume [about twice that in total volume], made of a single layer of 4” insulating brick.
If you have a larger oven, you may need more power; I see no problem with scaling this design larger, but it would be better to just increase the fuel flow by using larger jets than I did.
I would suggest using some type of removable jet in any case, since they need to be removed and cleaned between firings. You can drill a brass pipe fitting, for instance.
What this burner basically does is boil the kerosene and then spit the vapor at the oven; there's nothing precise about the sizes of anything. It's easy to control the power by controlling the pressure in the fuel tank.
Including a 4 hour soak at 500C, I use about 25 liters [6.5 US gallons] of fuel for a firing.
The jets can be drilled larger for more power; control gets more difficult at low fuel pressure and oven temperature if you need a slow start, though. But with a controller cycling the main flame on and off, it shouldn’t be a problem.
I started at 5 lbs. Pressure, and finished at 100 lbs, raising it from time to time as I needed more power.
If a fast temperature rise is no problem, just drill the jets a little bigger and run it at 30 or 50 lbs.
I don't want to say much about ovens; I built one, and it works. I got the information from one of the books on the subject, I can't remember which, and it isn't with me anymore.
But I do want to say this; if you want high temperature, you'd better use insulating brick. If you want efficiency, that is to say, to spare fuel, insulation is vital.
If you do the calculations for heat loss, you'll soon realize the massive amount of energy that leaves through the walls of the oven. All of that energy has to be replaced, as well as additional energy to increase the temperature.
Furthermore, the air required for combustion is normally entering the oven at ambient temperature; so if you want your oven to reach 1000 C. [1800F] inside, then any air that enters has to be heated above that temperature before it starts to do any work.
If you build an oven that you plan to keep for awhile, I would recommend a building a double wall chimney, and perhaps even duct the air from the outer chamber around the walls of the oven before feeding it into the secondary air ports. This will raise efficiency by capturing some of the waste heat, using it to preheat the combustion air. It will also raise the maximum temperature you can reach.
I haven't actually built an oven like that, but if I had to build another one, I would. If anybody has built such an oven, I'd like to hear about it. If you have a nice drawing, I'll put it on this page.
If you have any suggestions or additions to make to the information I've provided here, send it along.
If you'd like to add my information to any Web site you're keeping, just ask.
I put a lot of effort and thought into these burners; these are the third burners that I built for this oven. The first ones worked, but got too hot and burned themselves up after some firings.
I'd love to know if anyone uses this information; please drop me an e-mail, maybe even a photo!
Regards, and good luck!
Mark Holden